How to Create a BEP20 Token on BNB Smart Chain (BSC)
Learn how to effortlessly create and deploy your own custom BEP20 token on BNB Smart Chain, even without coding knowledge, using an intuitive no-code tool for a simplified and efficient launch.
This comprehensive, step-by-step guide covers everything you need to know, from understanding token standards to the practical deployment of your digital asset, helping you unlock the power of decentralized finance.
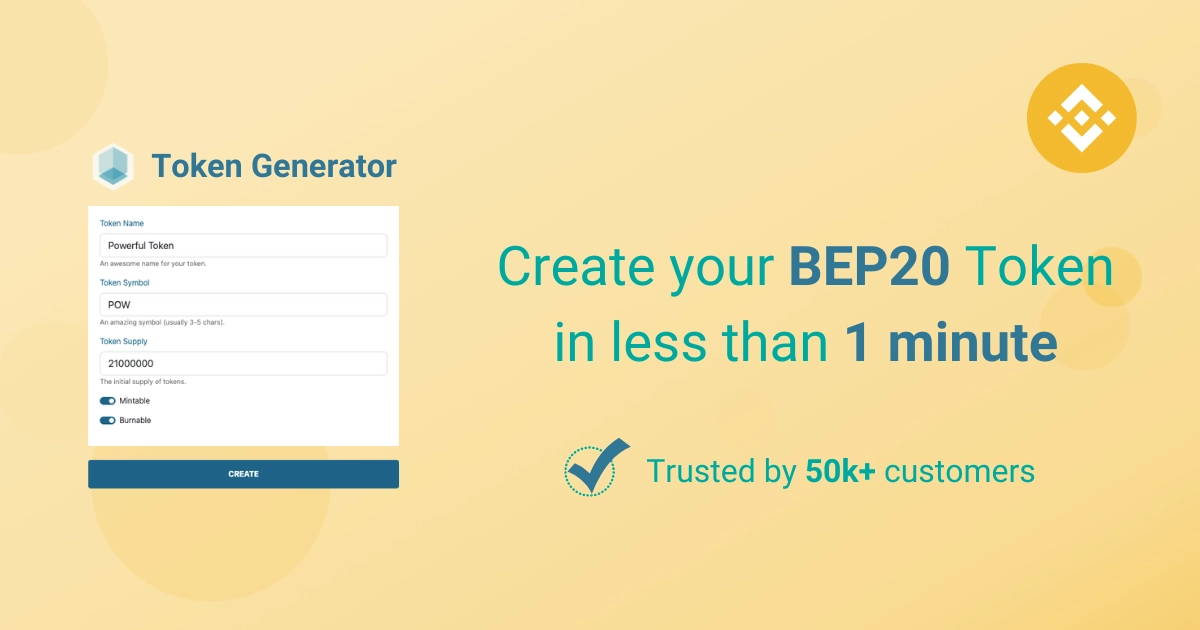
We'll be using the Token Generator for BSC, a powerful and intuitive tool that simplifies the entire process.
Introduction
In the rapidly evolving world of blockchain and decentralized finance (DeFi), creating your own digital asset has become more accessible than ever. Whether you're planning a new dApp, a community token, or simply want to explore the fascinating world of cryptocurrencies, the BEP20 standard on BNB Smart Chain provides a robust and widely adopted framework for token creation.
This tutorial will walk you through the entire process of generating and deploying your very own BEP20 token on BNB Smart Chain, utilizing Token Generator, the user-friendly tool powered by SmartContracts Tools.
We'll cover everything from understanding the fundamentals of BEP20 to the practical steps of bringing your token to life. By the end of this tutorial, you'll have a fully functional BEP20 token ready for use on BNB Smart Chain!
Understanding the BEP20 Standard and BNB Smart Chain
Before we dive into the creation process, it's essential to grasp what an BEP20 token is and why it's so significant, especially in the context of BNB Smart Chain.
What is a BEP20 Token?
BEP20 is a token standard on the BNB Smart Chain (BSC) that defines a set of rules for tokens, similar and compatible with the ERC20 Standard on Ethereum.
ERC20 (Ethereum Request for Comment 20) is a technical standard used for all smart contracts on the Ethereum blockchain for fungible tokens. Fungible means that each unit of the token is interchangeable with another identical unit. Think of it like a dollar bill — one dollar bill is worth the same as any other dollar bill.
The ERC20 standard defines a common set of rules that all tokens must adhere to, ensuring interoperability within the Ethereum ecosystem. These rules include:
totalSupply(): The total number of tokens in existence.balanceOf(): The balance of tokens for a specific address.transfer(): To transfer tokens from one address to another.transferFrom(): To allow a third party to transfer tokens on behalf of the token holder.approve(): To allow a spender to withdraw a pre-defined amount of tokens from an account.allowance(): To check the amount of tokens that an owner allowed to a spender.
This standardization is crucial because it allows different dApps, wallets, and exchanges to interact seamlessly with any ERC20 token.
Why BNB Smart Chain for Your BEP20 Token?
BNB Smart Chain (BSC) is a blockchain developed by Binance, offering a fast and low-cost alternative to Ethereum. It's popular for its high transaction throughput and compatibility with the Ethereum Virtual Machine (EVM), making it easy for developers to migrate dApps.
Deploying your BEP20 token on BNB Smart Chain means you can leverage these advantages, making your token more accessible and cost-effective for users.
BNB Smart Chain is fully compatible with the Ethereum Virtual Machine (EVM), which means that tools and smart contracts designed for Ethereum can be easily deployed and used on BNB Smart Chain. This compatibility simplifies the development process and allows for a smooth transition for developers familiar with Ethereum.
Creating and Deploying Your BEP20 Token on BNB Smart Chain
Step-by-Step Guide
Step 1: Access the Token Generator
Navigate to the BSC Token Generator page.
Step 2: Connect Your Wallet
Before you can create and deploy your token, you'll need to connect a Web3 wallet (like MetaMask) to the platform. This wallet will be used to sign transactions and pay for the gas fees associated with deploying your smart contract on the BNB Smart Chain blockchain.
- Click on the "Connect Wallet" button, usually located in the top right corner of the page.
- Select your preferred wallet (e.g., MetaMask).
- Approve the connection request in your wallet.
- Ensure your wallet is set to the BNB Smart Chain network. If not, the platform will likely prompt you to switch, or you'll need to manually change it in your wallet settings. You'll need some native BNB in your wallet to cover gas fees.
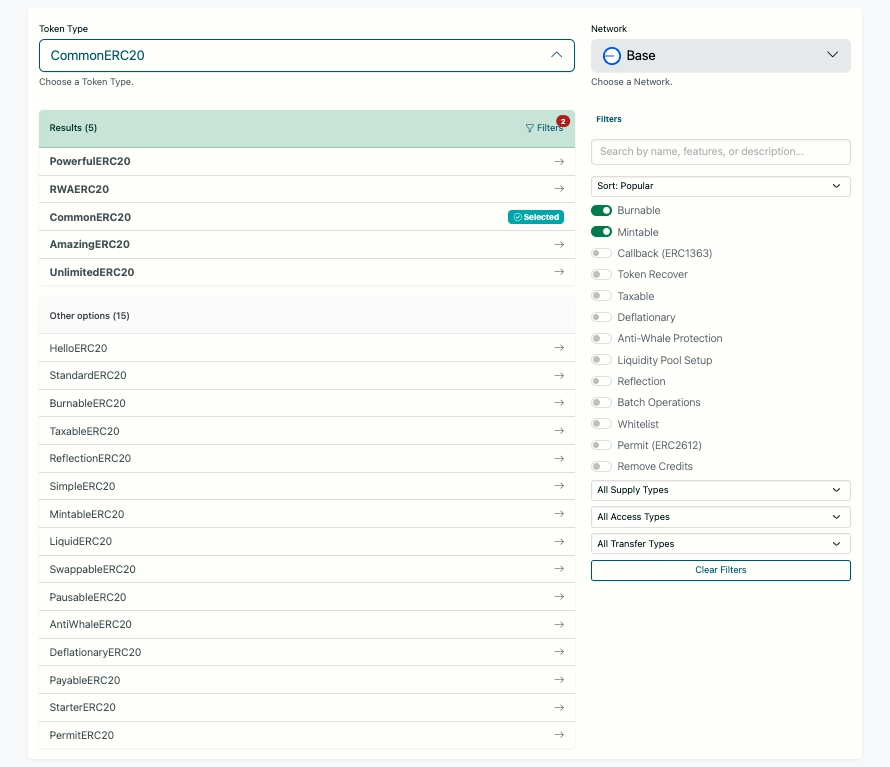
Step 3: Define Your Token's Properties
This is where you'll personalize your BEP20 token. The Token Generator will provide fields for the following:
- Token Name: This is the full, human-readable name of your token (e.g., "My Awesome Coin"). Choose something descriptive and unique.
- Token Symbol: This is the ticker symbol for your token, typically 3-5 characters long (e.g., "MAC"). This is what exchanges and wallets will display.
- Total Supply: The total number of tokens that will ever exist. This value maybe fixed once the contract is deployed. Be mindful of this number — it impacts the perceived value and scarcity of your token.
- Decimals: This defines the divisibility of your token. The most common value for BEP20 tokens is 18, meaning your token can be divided into 1018 smaller units. For example, if you have 1 token with 18 decimals, it can be represented as 1.000.000.000.000.000.000 units. Unless you have a specific reason otherwise, it's generally recommended to stick with 18 decimals for broad compatibility.
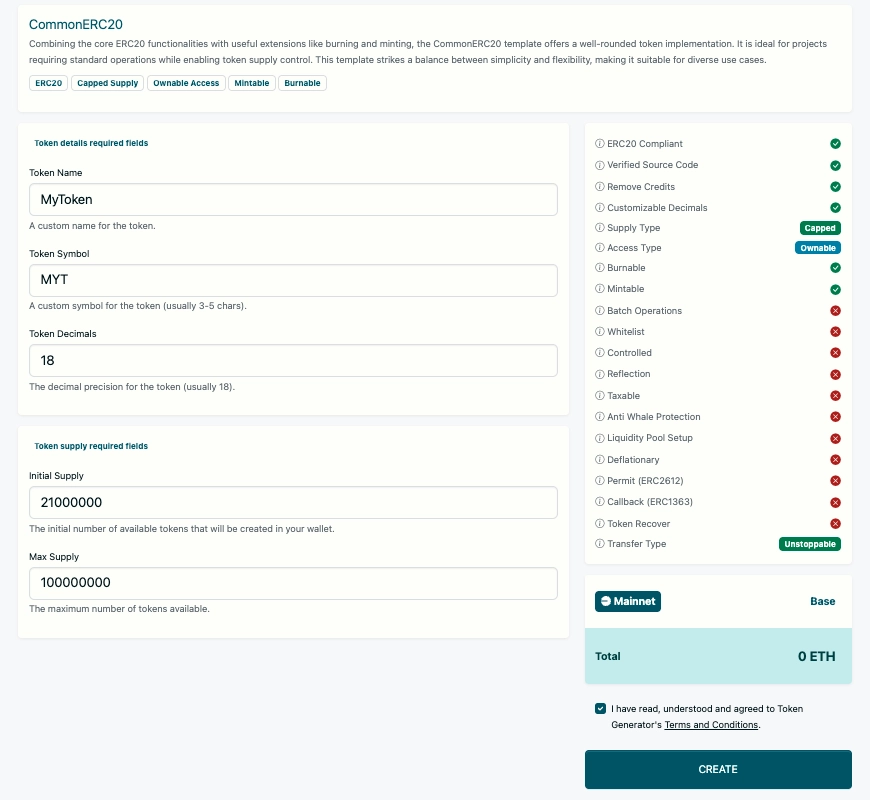
Step 4: Configure Advanced Options (Optional)
Token Generator also provides advanced options to add more functionality to your token. These might include:
- Burnable: The Token can be burned. It means that you can choose to reduce the circulating supply by destroying some of your tokens.
- Mintable: Owner or accounts with minting permission will be able to generate new tokens, up to token max supply. You can also disable minting if you don't want to generate tokens anymore.
- Anti Whale Protection: Users cannot hold more than a specific percentage of total supply. Owner can change that percentage or disable it. Owner can exclude some accounts from the anti whale mechanism.
- Liquidity Pool Setup: A Liquidity Pool pair will automatically be created on DEX. Token owner can set an initial supply amount to add to the liquidity pool and can choose to lock LP tokens forever in the token contract or receive them in their wallet.
- Deflationary: Token supply will reduce over time. For each transaction, a fee will be automatically burned. Owner can exclude some accounts from the deflation mechanism.
- Taxable: A tax fee will be added to transfers. For each transaction, a fee will be automatically sent to a predefined address. Owner can exclude some accounts from the taxation mechanism.
- Reflection: For each transaction, a fee will automatically be divided among token holders to reward them. Owner can exclude some accounts from the fee or from the reflection mechanism.
- Pausable: Token transfer can be paused. Useful to prevent trades until a period or freezing all token transfers.
- Capped: You won't be able to generate more tokens than the defined token cap. This ensure people that you will not generate more tokens than declared.
- Unlimited: You can generate more tokens with no limited supply. Owner can always stop minting to fix the current supply and stop generating new tokens.
- Whitelist: Owner or authorized users can define which addresses are permitted to send and receive tokens. This is crucial for RWA Tokenization, ensuring that only compliant users (e.g., KYC-verified addresses) can participate in transactions.
- Blacklist: Owner or authorized users can define which addresses are blocked to send and receive tokens. This is crucial for stablecoins, ensuring that funds involved in frauds, hack or legal requirements can be frozen.
- ERC1363 Callback: ERC1363 is an extension interface for ERC20 tokens that supports executing custom logic on a recipient contract after transfers, or on a spender contract after approvals, all within a single transaction.
- ERC2612 and ERC3009: ERC2612 Permit and ERC3009 Authorization enable gasless token transfers and approvals via off-chain signed authorizations. This makes the token natively compatible with the x402 protocol.
- Ownable Access: Token will have an Owner. Token owner will be able to mint new tokens or to call the finish minting function.
- Role Based Access: Token will have Roles. You can add or remove ADMIN or MINTER role to addresses. Token will be Ownable too.
- Controlled: Users with special permissions can freeze accounts and execute controlled operations, such as forcing token transfers between accounts. This is essential for RWA Tokenization, where compliance with legal and financial regulations may require interventions.
- Token Recover: There are lots of tokens lost forever into Smart Contracts. It allows the contract owner to recover any ERC20 or NFT token sent into the contract for error and send them to a receiver
Carefully consider which of these features are relevant to your token's purpose.
Step 5: Generate and Review Your Contract Parameters
Once you've filled in all the details and selected your desired features, click on the "Create" button. The generator will compile the Solidity code for your BEP20 token based on your inputs.
Before proceeding to deployment, it's crucial to review the contract parameters. While the generator automates the process, understanding the code, even at a high level, is beneficial. You'll typically see a summary of your token's properties.
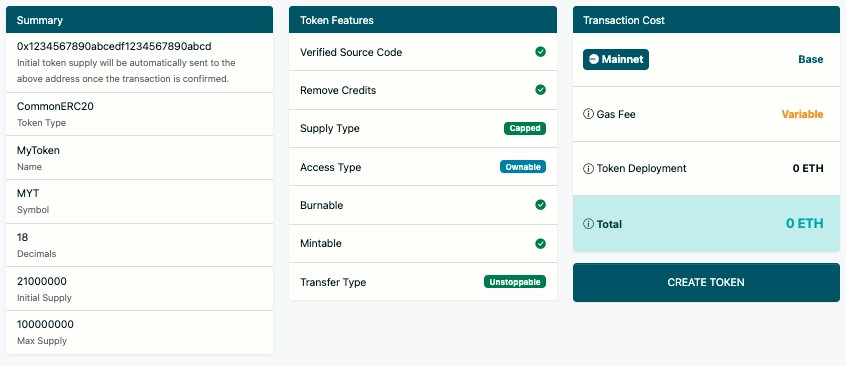
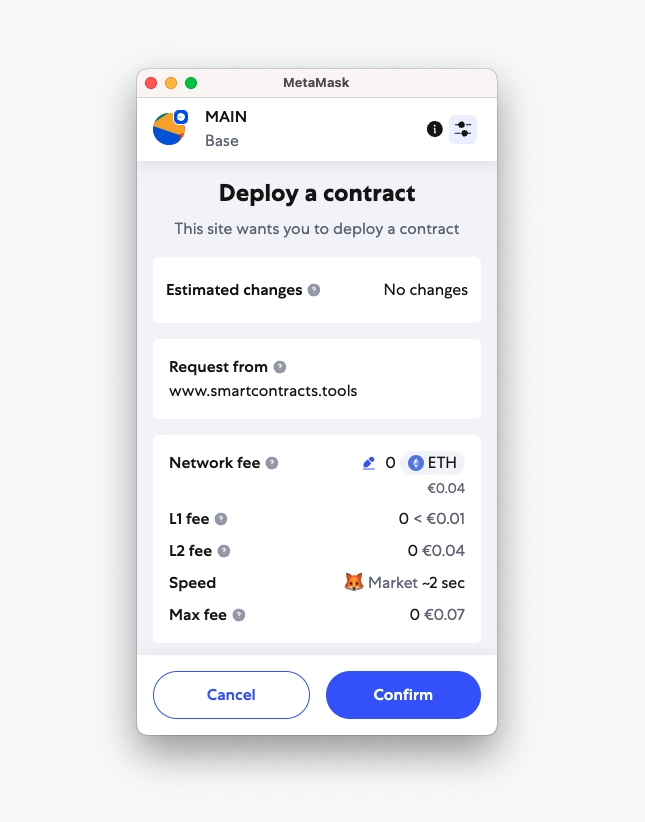
Step 6: Deploy Your Token to BNB Smart Chain
This is the final and most exciting step!
- After reviewing, click on the "Create Token" button.
- Your connected Web3 wallet (e.g., MetaMask) will pop up, asking you to confirm the transaction. This transaction will deploy your smart contract to the BNB Smart Chain blockchain.
- Review the gas fees carefully. Gas fees are paid in BNB and compensate the network validators for processing your transaction. The fee can fluctuate depending on network congestion.
- Confirm the transaction in your wallet.
Once you confirm, the transaction will be submitted to the BNB Smart Chain network. This may take a few seconds to a few minutes, depending on network conditions.
Step 7: Verify Your Deployment
After the transaction is confirmed, you'll receive a transaction hash (TxID) and the contract address of your newly deployed BEP20 token.
- Copy your Contract Address: This is the unique identifier for your token on the BNB Smart Chain blockchain.
- View on Block Explorer: Click on the provided link to the BNB Smart Chain block explorer (e.g., BscScan).
On the block explorer, you can verify your token's details, including its total supply, the deploying address, and all the functions defined by the BEP20 standard. You can also view the source code of your deployed contract.
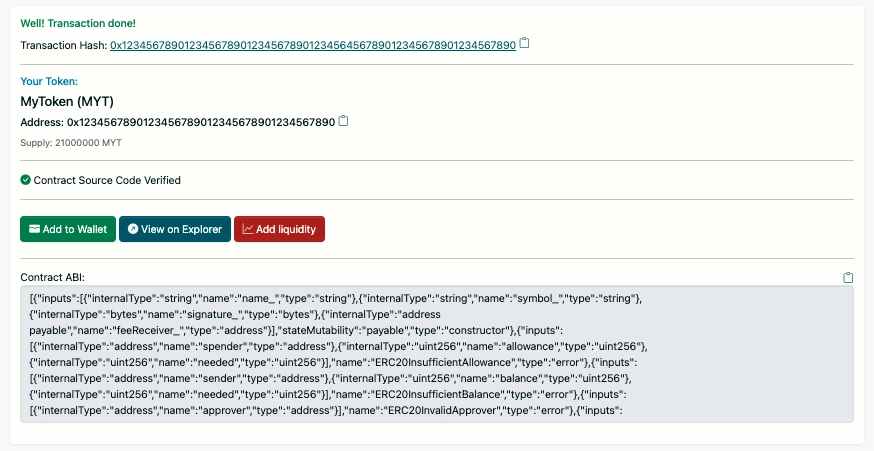
Adding Your Token to Your Wallet
Now that your token is live on BNB Smart Chain, you'll likely want to see it in your wallet. Here's how to add a custom token to MetaMask:
Option 1
Click on the "Add to Wallet" button. MetaMask will prompt you to accept token addition. Confirm.
Option 2
- Open your MetaMask wallet.
- Ensure you are connected to the BNB Smart Chain network.
- Scroll down and click on "Import tokens".
- Select "Custom Token".
- Paste your token's contract address into the "Token Contract Address" field.
- The "Token Symbol" and "Token Decimal" fields should auto-populate. If not, enter them manually.
- Click "Add Custom Token" and then "Import Tokens".
Next Steps for Your BEP20 Token on BNB Smart Chain
Congratulations! You've successfully created and deployed your own BEP20 token on the BNB Smart Chain blockchain. What's next?
Share Your Token
Let others know about your new token! Share the contract address and block explorer link.
Integrate with dApps
If you're building a decentralized application, you can now integrate your token into its functionality.
List on Exchanges
For broader adoption, you might consider listing your token on decentralized exchanges (DEXs) on BNB Smart Chain, such as Uniswap. This typically involves providing liquidity.
Build a Community
Foster a community around your token to drive adoption and engagement.